Wednesday, August 7, 2013

Blender Whipped Cream (oh yes...)

For those of you who have read previous posts, you'll remember that my family and I are staying in a furnished apartment in NC for the summer while my husband works a construction site here. So, it can be tough... but it's paid for... but I don't have anything I need.. .but it's free... but I miss my KitchenAid (dog, yard, clothes, etc.). Hmm. You can see the conflict. While I certainly shouldn't complain, it can be hard not having everything you need, especially when you're used to a fully stocked kitchen.

Case in point: the apartment complex provided us with two mixing bowls. Two. TWO! Now, a sane person would just wash out one of said mixing bowls whenever necessary but not I, dear reader. And as they say, "Laziness is the mother of invention!"

Yesterday, I wanted to make an icebox cake using some leftover cookies from this weekend and whipped cream. But as luck would have it, both mixing bowls were being used for leftover storage. That's when I got crafty. I knew I could make whipped cream in a food processor, but all I have currently is a blender. Could it work just the same? The answer is, yes!


Here's how: Start with your favorite whipping cream, preferably of the heavy variety. I know it can cost a teeny bit more, but it pays off in the end with a much creamier product. Also grab a little sugar and vanilla. In place of vanilla, you could also easily use another flavoring;  I've used bourbon, coffee, even strawberry jam to flavor my whipped cream in the past!


Dump the desired amount of cold cream into your blender. I wanted about 4 cups of whipped cream in the end so I started out with 2 cups (cream will double when whipped).

Remember: Cream whips MUCH better when everything is ice cold. That not only means your cream, but the blender as well. Try popping that baby into the freezer for a few minutes before you're ready to start whipping. It'll keep your cream happy and fluffy, promise.

 Cream also needs plenty of air to whip properly, so go ahead and remove that little plastic knob on the lid of your blender, leaving a hole. Just remember when you start blending to put your hand over the hole, covering it partially. Once you're confident the cream isn't going to splash out of the blender and all over you, you can go ahead and take your hand away. (Trust me on this one, my whipped cream pretty much blew up on me on my first go at this!)


At a high rate of speed pulse your blender, about 10 seconds
a time, until it starts to firm up. Every few pulses, make sure you stop to stir the cream with a spoon. Sometimes, cream can get stuck under the blades and you end up with butter- NOT delicious!

Now here's the magical part of this whole thing. After a few pulses, I ended up with fairly soft-set whipped cream. Not exactly what I was hoping for, but I figured it was a good as it was going to get in my blender. So I removed the lid, added sugar and vanilla to taste, and stirred it with a large spoon. Suddenly, voila! The cream firmed up nicely, with medium stiff peaks- perfect for icebox cake. I'm not sure why, but it probably has something to do with the air that the cream was exposed to when I removed the lid and stirred.

And that's it! Super easy, super fast, and great if you're short on the "proper"mixing supplies. Enjoy!

Click Here to See Where I'm Linking Up!

Saturday, August 3, 2013

Homemade Welding Hat

Everyone, please make yourself comfortable and grab a snack, because I'm about to tell you a little about my husband. Make that gush...

My husband is amazing. He's brilliant. He's the best husband ever. He's a fabulous father. He makes the best fried eggs. He makes me feel pretty. He eats dinner even when I burn it black. Ok... that's from a Shania Twain song... but you get the picture. I think he's pretty great.

 He is also CRAZY handy. Seriously, I've yet to find something that he can't fix. So what does a wife with a few spare hours and some scrap fabric make him as a "Thanks For Being So Amazing" gift? How about a pretty cool camo welding hat?

For those of you that don't know, a welding hat is something that welders wear underneath their helmets to keep the sparks off their necks and the sweat from their eyes. It's basically a backwards baseball cap. They oftentimes come in crazy patterns and colors and run anywhere from $5-$20 if you buy it premade. I used about a half yard of fabric and a little scrap of fusible web to make mine, so it probably cost me about $3 and about an hour to make. I'm only a beginner at sewing, so if you've got a nice stash of fabric stored up and some know-how, this would take nearly no time and no money to make something really cool.

I didn't have the truck that day, so I did a quick web search for a welding hat tutorial. One of the first links that popped up was this photo file from Flickr that had a free, easy-to-size printable pattern that I decided to give a try. Welding Hat Pattern and Instructions

The really cool thing about this pattern is that it has a sizing scale right on the page, so you can increase or decrease the size right there on your printer without any trouble. And I like trouble-free!

Probably because I'm a beginner, I found the instructions for constructing the crown really confusing, so I just made two "bowls" and then attached them, wrong sides together, with a topstich to form the outside of the cap and the lining. Other than that, the instructions were fairly easy to follow. This was a quick project that I could easily get done before naptime was over ;).

And here is the finished product!

It's definitely not perfect, but I'm pretty proud of it! 

Aaand... if you just want a sassy little baseball hat, just flip that baby around and rock it (my dad says I should make them for Britney Spears, haha).  

I think my husband will love it! 

Click Here to See Where I'm Linking Up!


Toddler-Friendly Veggie and Fruit Smoothie


Ladies and Gentlemen, allow me to introduce you to Ashlin, my darling first born; the first little person to call me "mama." She's silly, charming, smart and sweet. And... she loves French fries. Upon turning two, my once good eater decided that she hates anything green, healthy, and not cut up into a stick and deep fried. Lately, I've been at a bit of a loss. 


But then, I found the solution! Enter kefir yogurt. This magical stuff is basically a drinkable yogurt that's been around since the cavemen and is full of 12 different live and active cultures that all add up to a healthy digestive and immune system. Seriously,  kefir actually means "good feeling" in Turkish, and they mean it! It's actually really delicious too. I discovered it when I realized that having two kids under two didn't exactly lend itself to my eating breakfast. And ( drumroll please!) Ashlin likes it too! 
 
So, in addition to some yummy strawberry kefir, I grabbed a bag of precut, ready-to-steam butternut 
squash (because I'm lazy), and gave it a quick nuke in the microwave. I thought about adding in another type of vegetable- maybe kale?- but I thought since this was my first go that I'd try something mildly sweet, so squash it was.

To the cooked butternut squash I added a few strawberries and blueberries I had in the fridge since I wanted to pack this puppy full of as much fiber and antioxidants as I could. And though kefir is super tasty, it's a bit on the tart side, so the berries are going to help mask that. All in all, it came out to be about 1/4 cup of each fruit and the squash, and about 1/2 cup of kefir. 


Dump it all into your handy-dandy blender...


Pour into sippy cup...


And sit back and try not to act too excited when she drinks it!!

Click Here to See Where I'm Linking Up!

Wednesday, July 17, 2013

Darling Baby Bonnet


A few weeks ago, my husband bought me a sewing machine and since then I've been busily getting to know my way around it. Luckily, I have two beautiful little models to sew for! One of the first projects I tackled was a baby bonnet. I found a tutorial online that seemed simple, read it about a thousand times, pressed EVERYTHING, and dove in!

Here is the tutorial I followed. It was incredibly easy to follow, and the pictures are fabulous for you visual learners (like me)!
The Cottage Home Ruffle Bonnet Tutorial


I ended up making two bonnets for my little Katie Marie- one for her 4th of July outfit (and our family trip to Nashville) and one more just because. Here they are:


I followed the tutorial fairly closely. I did, however make a few tiny changes. With the first bonnet, the "Americana" patterned one, I was too intimidated to make my own ruffle so I bought one and sewed it in as directed. With the second bonnet, the blue floral, I was too lazy to make my own tie straps, so I bought a pretty pink sheer ribbon and used that. Either way, it was a cinch to make and took me a total of about 1.5 to 2 hours per bonnet (and most of that with a crazy toddler and teething baby running around)! Now I'm off to make a ton more!!

Click Here to See Where I'm Linking Up!


Thursday, July 11, 2013

Cute "Spooning" Wall Art

Lately I've been noticing lots of white-on-white canvas art on Pinterest, along with a few cute prints featuring spoons. So, since it was a rainy afternoon and I had some free time, I decided to combine the two! What resulted was some really cute (and EASY!)  wall art- perfect for an anniversary or wedding gift.

So here's how I did it:

I went to my neighborhood craft store and bought an 8x 10 canvas, some Gorilla Glue, spray paint, and wooden letter cutouts. I've seen this done with foam letters, but the wooden ones were on clearance, so wood it was!
I laid my canvas out and fiddled with the wooden letters until I liked the arrangement. Once I did, I glued them in place with my trusty Gorilla Glue.

Then, I took the whole thing outside and spray painted it glossy white.

While that dried, I chose my spoons. I liked the idea of a big spoon and a little spoon, so I searched my kitchen until I found the perfect, mismatched pair. Once I did, I sprayed them with metallic silver paint.  After they dried, I made the decision to spray my little spoon with a silver glitter spray. Because...well, does anyone really need an excuse to add some glitter?


Once everything had dried overnight, I used my Gorilla Glue to attach the spoons onto the canvas.

After about an hour, I added some picture-hanging hardware, some ribbon, and stepped back to admire it! I can't wait to give it to my friend who is visiting this weekend. :)

What do you think?? I LOVE how it turned out!!!

Visit thecsiproject.com

Click Here to See Where I'm Linking Up!


Saturday, June 29, 2013

The Crispiest Fried Chicken

I've always been a bit afraid of making fried chicken. I'm no stranger to deep frying, but I always stuck to things that weren't going to make my family sick if I did it wrong. But, since we are spending a summer in the South, I've decided to do as the Southerners do, and fry up a bird!

This recipe promised to deliver crispy fried chicken with a coating that would stay crunchy even after being refrigerated for a while- and boy did it ever! It was flavorful and stayed crispy enough that I could make it while the girls were napping at lunchtime and still serve for dinner 5 hours later. I will say one thing though: this is a MESSY recipe. Don't try this at home on a busy weekday when you are stressed and pressed for time. My kitchen looked like a bomb went off in it after I was done. However, I was so happy stuffing my face with chicken, I truly I didn't care.

Here are some things to keep in mind about this recipe:

1.) You'll need a cut-up, bone in, skin on chicken, about 3 pounds. Actually, any amount of chicken with the bones and skin will do. You like all dark meat? Just grab one of those big packages of drumsticks. I actually couldn't find what I was looking for (I like a mix of dark and white meat), so I just bought a whole chicken and cut it up myself. It adds an extra step, but oftentimes it's cheaper.

2.) I brined my chicken, but it's totally up to you if you want to. I think it makes the chicken more flavorful and moist, but you have to do some advanced planning. If you're like me, that doesn't happen often (cue screaming children, "I'm hungry!!!!") but if you're inclined, heres what you do:

-Dissolve 1/4 cup of salt into about 1 quart of cold water in a large container. Put all of your chicken pieces in, cover, and chill for a few hours. That's it! No big deal.

3.) Use Wondra Flour when making your breading. You can find it in any grocery store in the baking aisle. It's in a little blue cylindrical canister, and is probably what your grandma used to make gravy. This quick-dissolving flour has been pre-cooked and dried, so it's super light. That definitely translates into a light and crispy crust for your chicken later on.

4.) Make sure you have LOTS OF SPACE. You'll need various stations for all of that brining, breading, frying goodness going on with this recipe. If you start with plenty of room to spread out, there's less of a chance you'll accidentally handle something cooked that has handled something raw. And cross contamination is no joke! (Salmonella, anyone?)

5.) If you can, use peanut oil. In my experience, the flavor is better than vegetable oil, and it has a super high smoke point, so things get crispier without drying out the meat on the inside. Plus, according to the good folks at The Peanut Institute (who knew there was such a place?) peanut oil doesn't absorb the flavor of the food you cook in it, so you can fry garlicky mozzarella sticks in in one second, then turn around and fry up a batch of doughnuts without the flavor suffering at all. Cool!

Phew! Ok, that's all of the tips I can think of before we roll our sleeves up and get into the recipe. Trust me, it's not as intense as it looks. And really, it's worth it. This will leave you looking like a total goddess of the kitchen. Albeit, a goddess covered in flour and oil, but that just adds to the overall mystique!

The Crispiest Fried Chicken

Serves 4t
3 pounds of bone-in, skin-on chicken                                      1 teaspoon dried thyme
1 1/2 cups flour (preferably Wondra)                                         1 teaspoon dried sage
1 1/2 cups constarch                                                                   1 teaspoon garlic powder
2 teaspoons pepper                                                                    1/4 teaspoon cayenne pepper
1 1/2 teaspoons baking powder  
                                            3 quarts frying oil (preferably peanut)


1. Make the brine. Dissolve 1/4 cup salt into 1 quart of water in a large bowl or pot. Place in chicken pieces, cover, and refrigerate for at least one hour.

2. Whisk flour and cornstarch together in a large bowl. Scoop out one cup of the mixture and set aside. To the remaining flour mix, season with pepper, baking powder, thyme, sage, garlic powder, and cayenne. To this, add 1/4 cup water and rub together with your fingers until its evenly mixed. It will be a lumpy mess at this point!
Ready to rest in the fridge before frying!
3. Set up your breading stations! In 3 shallow containers (I use pie tins), line up your unseasoned flour mix, one with 2 cups cold water, and another with the seasoned flour mix.

4. Piece by piece, remove chicken from brine and toss in unseasoned flour mix. Next, dip the chicken quickly in the water. Finally, dredge the chicken in the seasoned flour mix, pressing on the breading to help it stick if necessary. Repeat until you've breaded all of the chicken.


5. Set breaded chicken onto a baking sheet, and refrigerate for at least 30 min.


Peanut oil bubbling away!
6. While chicken is resting, heat your oil. In a large pot over med-high heat, heat about 3 quarts of oil in a large pot or Dutch oven (that translates to the oil being about 2 inches deep, give or take). Heat it for about 15 minutes, or until oil temperature reaches 350 degrees F.
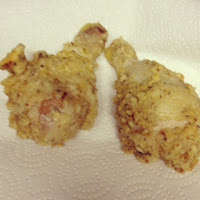
Ater the first fry. Raw= not delicious!!!


7. Start frying that chicken, baby! In two or three batches, being careful not to overcrowd your pot, fry chicken for 5-7 minutes, until the crust is JUST STARTING to get golden and crisp. NOTE: Your chicken will NOT BE DONE! (This is just your first round of frying that evaporates all of that anti-crispy moisture in the breading that we are trying to avoid). Place half-cooked chicken on  plate lined with lots of paper towels. Let chicken rest 5-7 minutes.


8. After completing the first round of chicken frying, you're ready for the last one! Make sure your oil temp is back at 350 degrees F. In two or three batches, return the chicken the hot oil, and fry until done deep golden brown and crispy, about 7 minutes. Make sure you check your chicken's internal temp! Breasts should register at least 160 degrees, and any dark meat should be around 175 degrees. And if all else fails, cut one of those little guys open at the thickest part and peek inside to see if its pink or not (I know that's blasphemy for serious cooks, but if you're paranoid like me, it's helpful). 

9. Transfer your cooked chicken onto a plate lined with lots of paper towels. Refrigerate uncovered until ready to eat, or just tuck a napkin in your shirt front and dig in!

Yum!


I hope you enjoy this as much as my family did!

Click Here to See Where I'm Linking Up!


Wednesday, June 26, 2013

Super Easy Crackle Paint DIY

Have you seen all of the crackle paint tutorials hitting Pinterest lately? Well, I have officially caught the bug. I just love how you can take a ho-hum piece of furniture and turn it into a beautiful conversation piece for your home.

Let me start out by saying that I am no expert. My previous furniture refinishing experience comes down to spray painting a desk and hitting it with some metal pipe from my husband's shop. And while it came out beautifully, I've been itching to try my hand at some new techniques for a while now.

I started out by combing Craigslist for an inexpensive, smallish, but pretty piece of furniture. Trust me, I have dreams of doing an entire dining room set with this technique, but knowing me, I figured I'd need to experiment on something easy and cheap just in case it was a total disaster!

I found a pretty little sofa table that cost me $30. It was black to begin with, but I gave it a quick clean and painted it with some gray satin spray paint that I had on hand. I used Rust-Oleum American Accents Spray in London Gray.

Here's a few pictures of my table with the gray base coat. You can see that I didn't get too picky with the coverage- we're gonna cover this baby in crackle-y paint anyway, right?

 Here's another close-up shot of how badly I sprayed the table with the gray base coat. That's the beauty of crackle paint- imperfect is what you want (This really drove my husband, an engineer, crazy by the way. He's a little too mathematically correct to be a fan of "perfectly imperfect" sometimes)!

After letting the base coat dry for a few hours, I painted the entire thing with a crackle medium. The one I chose was Valspar Weathered Crackle Glaze. It wasn't super cheap (about $15) but I only used about a 1/4 of the quart so I can use it again. It's also good to note that Valspar makes a Porcelain Crackle Glaze that makes smaller cracks in the paint. But I wanted big, heavy cracks that would stand out. 

After about an hour of drying time, the glaze was a nice level of tackiness. You want it to be slightly sticky, not wet. If you wait too long and the glaze dries, just paint on a little more glaze and wait for it to get slightly sticky again. 

Once the glaze was ready, I painted on a thin layer of Olympic Icon Interior Paint in Colonial White (a nice, off-whitesh color) that is in a FLAT finish. 

Here are some things to keep in mind when doing the topcoat of your crackle project:

1.) ALWAYS use a flat or matte finish paint. Anything else won't work.

2.) Only paint in one direction when applying paint. Don't sweep your brush back and forth. This stressed me out at first because I thought I wasn't getting enough white paint on top of the gray, but it turned out great. Trust me- it'll turn out beautifully!

3.) Don't glob on too much. I made this mistake when I was having the above-mentioned stress-out. It ends up dripping down your piece and not really doing its crackle thing correctly. But if you do do this, remember to just let it dry and you can sand if off later.

And about 20 minutes later.... crackle, crackle, crackle!
Another thing to remember- see that there are one or two big spots of no white paint? They are perfectly fine, but after staring at the thing for about 5 hours, I wasn't happy. So I just carefully sanded down those spots, reapplied the glaze, let it get tacky, and then (carefully!) repainted my topcoat of white. The nice thing about this finish is that it's very forgiving. :-)


Scroll detail after I sanded off some of the white crackle. 


The one thing I found that is if there's any detail in your piece, the crackle finish might cover it up more than you'd like. This happened with mine. There is some pretty scrolling on the front of my table and I wanted it to stand out. So after the paint dried, I just took a little piece of sandpaper and scuffed off some of the white paint to let the detail shine through.


Once I was happy with the way it looked, I let it dry overnight and sprayed the whole thing with Rust-Oleum Ultra Matte Clear Cover to seal it all in. So easy!


And here's the finished product! I'm in love.

Click Here to See Where I'm Linking Up!